NOTICE!!! PLEASE READ!!!
It has been over 3 years since I originally wrote this guide. It is out-of-date.
Check the RuneLite Wiki for more up-to-date instructions for setting up a development environment for RuneLite on Windows
This post is the first in a series that documents my journey of writing plugins for the popular open-source RuneLite client for Old School RuneScape. This first post covers how I set up the built environment for RuneLite.
This tutorial is very similar to the official Building with IntelliJ IDEA documentation provided on the RuneLite GitHub Wiki. However, this post includes additional discussion on setting up the development environment for those who are new to the project. Rather than a quick start style tutorial (like on the RuneLite Wiki), this post covers topics more deeply and document some things I learned along the way. The post is targeted to those who have programming experience, but might not be Java experts and those who have not had previous experience with the RuneLite project.
This tutorial is performed on Microsoft Windows 10 but should be adaptable to OS X or Linux, or different Windows versions.
- Update: 2019-02-23: Rewrote the post to align with changes to the RuneLite project. Also added installation of Git client based on post comments.
Contents
- NOTICE!!! PLEASE READ!!!
- Installing the Recommended RuneLite Development Environment
- Configuring IntelliJ and the RuneLite Development Environment
- Conclusion
Installing the Recommended RuneLite Development Environment
The RuneLite authors recommend using IntelliJ IDEA as the IDE (Integrated Development Environment) of choice. Additionally, they state that the Java Development Kit (JDK) version 8 (or above). Furthermore, the RuneLite source code is distributed using Git from the popular GitHub hosting service. The following sections outline where to download and how to install each required component.
Downloading and Installing git
Git is a software version control system. Most people know it from the popular GitHub project - a web-based hosting service for software version control using Git. Basically, GitHub allows developers to host software code for free and you interact with a developers code using Git. For example, you can clone, or download, the RuneLite source code using Git. Git is primarily developed on Linux but is available as a multiplatform tool. The most popular Git client for Microsoft Windows is Git-SCM - this tool integrates well with the IntelliJ IDE.
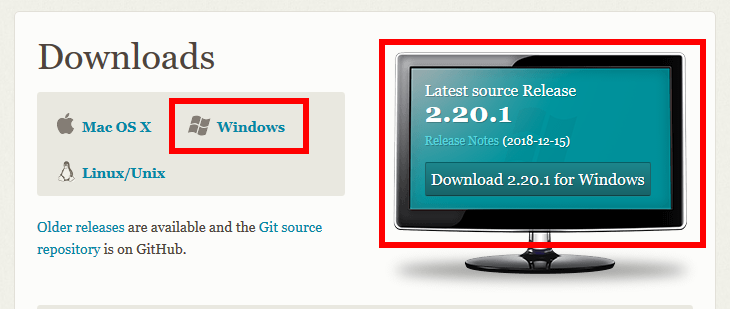
Start by downloading the Git-SCM tool from the official download page. Select the newest version available for Microsoft Windows.
Install the Git-SCM tool by running the installer. There are a large number of options available during installation - so of which can be pretty important. If you are not intending to use Git extensively, I would recommend installing with the default options selected. However, if you intend to use Git extensively, make sure you read and understand each of the options available. Personally, I only install Git Bash (not the GUI), use the vim editor, use MinTTY, and disable the Git Credential Manager.
Downloading and Installing Java Development Kit (JDK)
The Java Development Kit, or JDK for short, is the Java environment required to develop and also run Java applications. To play Old School RuneScape, you most likely already have Java installed, however, it is most likely the Java Runtime Environment, or JRE for short. The JDK and JRE are not the same. The JRE is only for running Java applications, while the JDK is for developing or making Java Applications. Therefore, you must install the JDK to build and develop the RuneLite project.
This tutorial used the Java SE Development Kit version 8u181. The download is available from the official Java SE Development Kit 8 Downloads page. Navigate to the provided URL, and download the installer for your specific operating system.
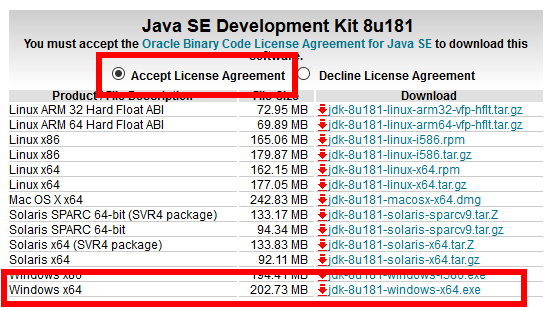
Since I am using Windows 10, I downloaded the Windows x64 download option. Make sure you check the Accept License Agreement button to download. The file downloaded was named: jdk-8u181-windows-x64.exe. The setup is simple, just install using default options.
Downloading and Installing IntelliJ IDEA
The Download IntelliJ IDEA website has packages for Windows, OS X, and Linux. There are two versions available, the Ultimate and the Community editions. The Ultimate edition is a commercial product which requires payment but does net you extra features. We do not need these, and the RuneLite developers state that the Community edition is sufficient. The Community edition is released under the Apache 2.0 license, so it open source and completely free.
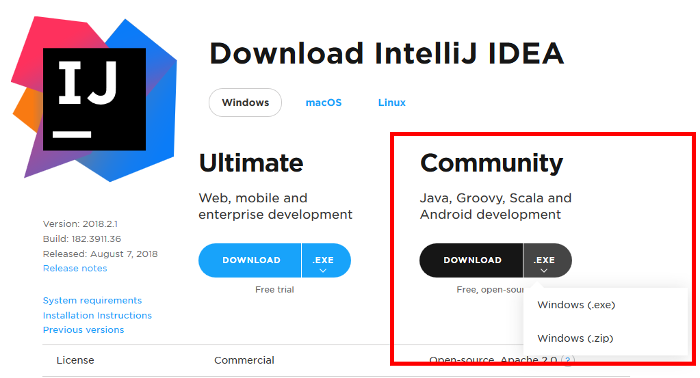
Download the Community edition for your specific platform. Since I am using Windows 10, I selected the Windows (.exe) download, to install IntelliJ IDEA on a Windows 10 system. The file downloaded was named: ideaIC-2018.3.4.exe when I set up my last RuneLite development environment. The setup is simple, just install using default options.
Configuring IntelliJ and the RuneLite Development Environment
The RuneLite authors recommend using IntelliJ and specify the number of customizations to configure the build environment after installation. After you complete the IntelliJ installation and run the IDE for the first time (find it in the Windows Start Menu), you will be prompted to perform some customizations of the software. None of these are critical but can be useful.
Firstly, there is an option to import previous settings. If you have never used IntelliJ, just select Do not import settings. Accept the JetBrains Privacy Policy. You can select whether or not to send Usage Statistics.
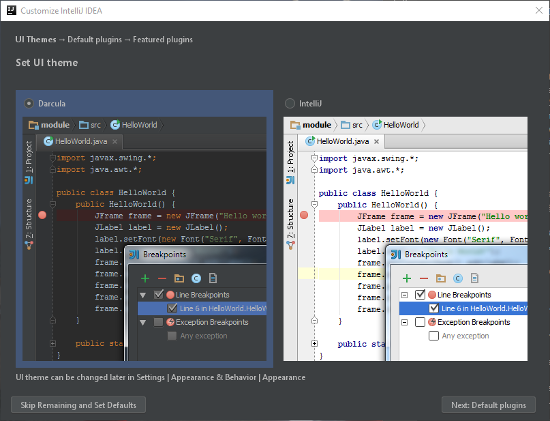
Secondly, you will be prompted to perform basic customizations, including the theme (light or dark) then install plugins. You can skip this and perform these tasks in the actual IDE itself.
Downloading the RuneLite Project
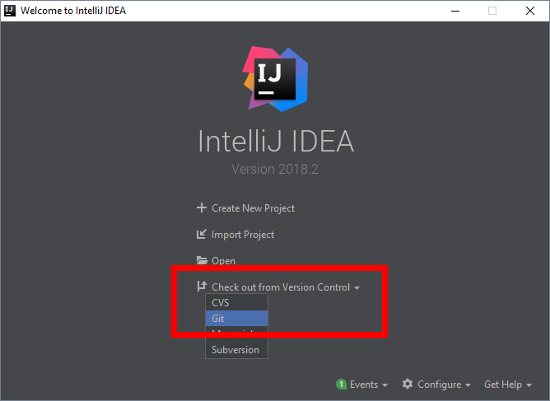
IntelliJ will now start and present you with the normal Welcome Screen. A good option here is to download and set up the RuneLite project. This is easily achieved using the Check out from Version Control and then select Git from the drop-down menu.
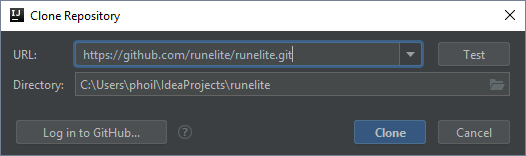
You will be presented with a Clone Repository dialog box where you can enter the URL of the RuneLite Git repository. The URL required is:
https://github.com/runelite/runelite.gitYou simply need to enter the provided URL into the URL box. Make sure you take note of the Directory value. This is where the project will be downloaded. When you are happy to proceed, click the Clone button.
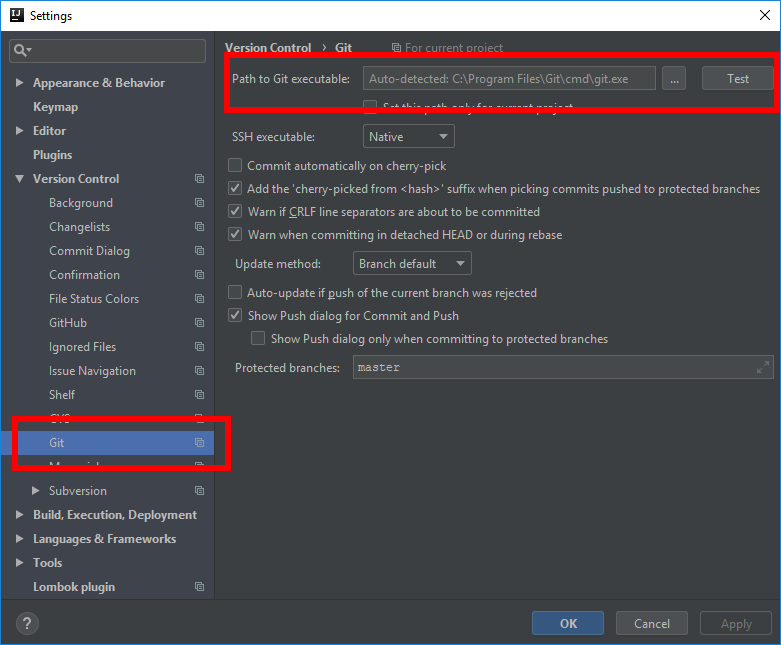
If you get an error similar to: Cannot Run Git: File not found: git.exe - make sure you check your Git is integrated with IntelliJ. This should happen by default as we installed Git first. If you get the git.exe not found error, you can configure Git in the Settings interface in the IntelliJ IDE. Below is a screenshot that shows the key configuration to make sure Git is available in the IDE. If not correctly working, you can set the Path to Git, then Test to ensure the git.exe program is available.
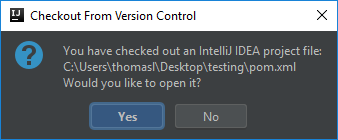
After you have successfully cloned the RuneLite repository, you will be prompted to open the IntelliJ IDEA project. Project files store a bunch of configurations used by the IDE in conjunction with the project. Basically, they make life easier by setting default configurations. When you are prompted to open the RuneLite project file, select Yes.
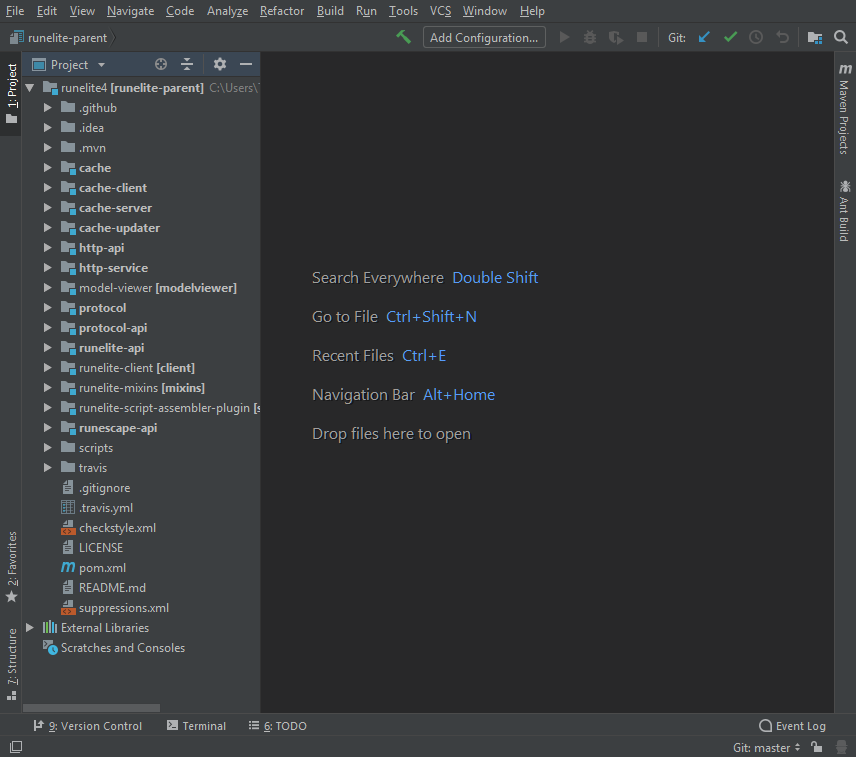
That was the last step for importing the RuneLite project. You should now be presented with the actual IntelliJ IDE interface. The RuneLite project may take a little to load when first opening as a bunch of dependencies are resolved and settings loaded. You should see the RuneLite project folder structure of the left panel.
Installing the Lombok Plugin
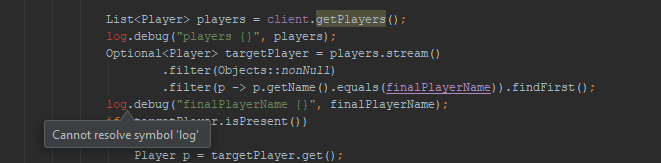
The RuneLite developers recommend installing the Lombok plugin in IntelliJ. They state that if you are getting a Cannot resolve symbol ‘log’ error, this is due to not having the Lombok plugin. This plugin has some advanced options, but from my investigation it is primarily used by RuneLite for debugging - that is, using print statements for debugging code when modifying the original RuneLite source code. This is exceptionally useful! See the image below for an example of this error when using the log.debug() statement.
Luckily for us, it a straightforward process to install the Lombok plugin. Use the following list of instructions:
- Navigate to the File menu
- Select Settings… (in OS X it will be called Preferences)
- A new dialog box will appear
- Select Plugins from the left-side menu
From here use the following steps:
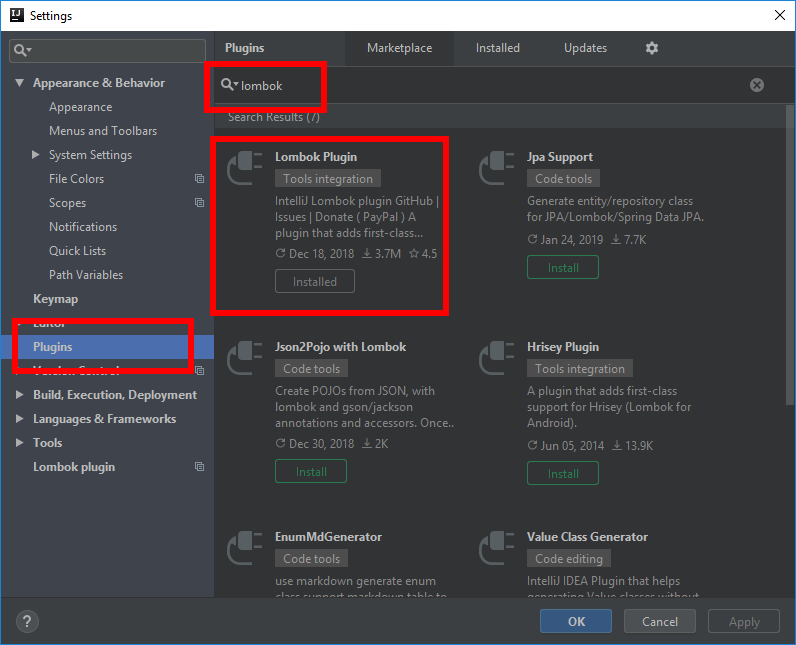
- In the search box, enter lombok
- Find the Lombok Plugin in the search results and highlight it (single left-click)
- Use the green Install button to install the plugin
- IntelliJ will install the plugin and ask to restart the IDE
You should be prompted with a new dialog box that looks like the image below. Note that in the image below I had already Installed the plugin.
These steps should solve any Cannot resolve symbol or Cannot resolve method errors for any log.debug() statements.
Creating a Build Configuration
The IntelliJ project file shipped with the RuneLite project provides a general configuration environment. However, we now want to add a Maven project and create a build, or compilation, configuration. This will allow us to actually compile the source code. The following steps outline how to accomplish this:
- Navigate to the Run menu
- Select Edit Configurations…
- A new dialog box will appear
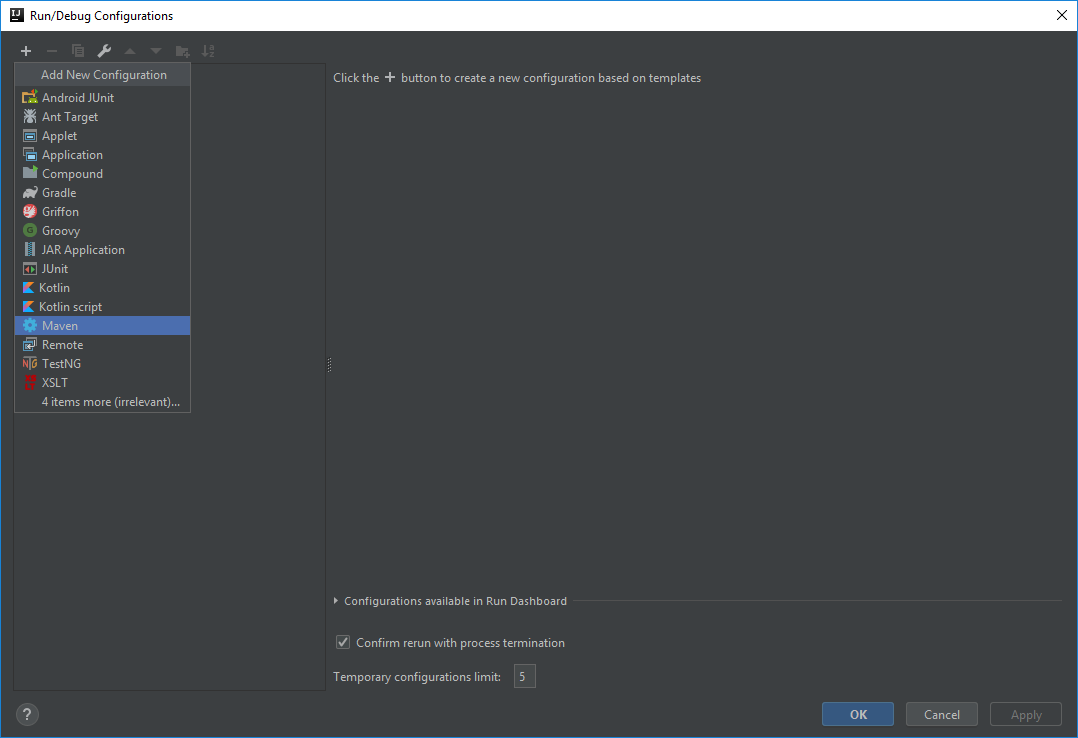
- Left-click on the plus sign in the top left corner to add a new configuration
- From the drop-down menu, select Maven
This process will create a new configuration for your IntelliJ project. In this new configuration we need to set a few configuration options:
- Set the Name of the new configuration. I would recommend using a descriptive name that summarizes the purpose of the configuration, so I named this configuration
Build- as it builds, or compiles the RuneLite source code - Set the Working directory to be the RuneLite folder. This is easily achieved by left-clicking the Folder icon at the end of the input box and selecting
runelite-parent - Set the Command Line option to skip tests while building (this will save a lot of time during project building). The value to set is:
install -DskipTests -UWhen finished, your configuration should look like the image below. Make sure to save the configuration by using the Apply button.

The output of this process is a new Maven project for building RuneLite. After finishing the configuration of IntelliJ and RuneLite, the building of the project is relatively straightforward. In the future, we can run this configuration whenever we want to compile the source code.
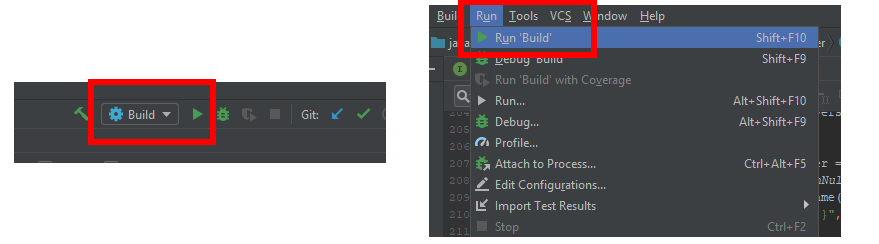
I would recommend running the build configuration right-now. The key thing here: make sure you are on the Build configuration (even though there should only be one configuration at the moment!). This can be selected using the configuration drop-down menu in the IntelliJ IDE. This can be found in the top menu bar and has a cog icon next to it (check the image below for an example). After selecting the Build configuration, we need to just Run the build process specified by the Maven project. You can use a variety of methods to achieve this:
- Left-click the green arrow icon next to the configuration menu
- Navigate to Run, then select Run ‘Build’
- Or simply use the shortcut hotkeys
Shift+F10
NOTE: As documented on the RuneLite Wiki: Many users have reported issues where RuneLite fails to run after the next step. Running the Maven build a second time should make it work. I did not experience this issue, but it is better to be thorough in case someone reading this post encounters the same problem.
NOTE: The first build will take a while as all the RuneLite dependencies are downloaded, which will only occur during the first build process.
Creating a Run Configuration
So far we have configured the IntelliJ IDE to build the RuneLite source code. This process results in a compiled version of the RuneLite client that we can actually run and play OSRS. But how do we run the actual RuneLite client? To do this, we need to add another configuration. Luckily there is quite an easy method to set up the configuration.
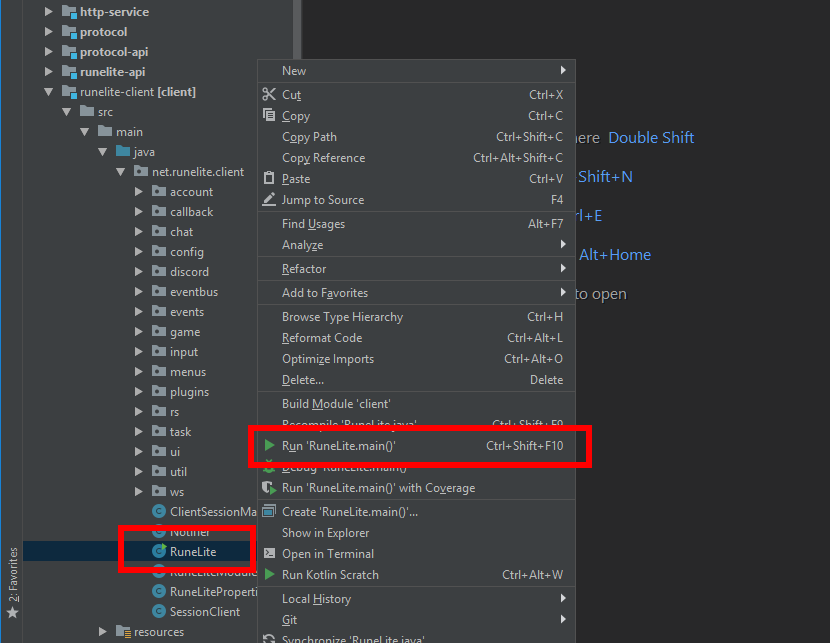
Start by navigating to the location of the folder of the RuneLite client in the Project structure in the left-side panel in IntelliJ. The full location is:
runelite-client\src\main\java\net\runelite\clientThe image below provides a visual example of where the RuneLite project structure we are located. When in the client folder, look for the Java class file named RuneLite. The is the primary entry point for the RuneLite client. Note how there is a little green symbol that looks like a play button on the file icon. This indicates that this specific file is able to be run, or executed. If you right-click the file there will be an option in the menu called: Run 'RuneLite.main()'. Left-click this to run the RuneLite client…
After running this, the RuneLite client should start to load. But most likely, it will not load successfully and get stuck in the startup process. This is because we still need to add options and arguments to the RuneLite configuration.
- Navigate to the Run menu
- Select Edit Configurations…
- A new dialog box will appear
- Expand the Application drop-down box (using the little arrow icon)
- From the drop-down menu, highlight RuneLite
- The right side of the panel will change
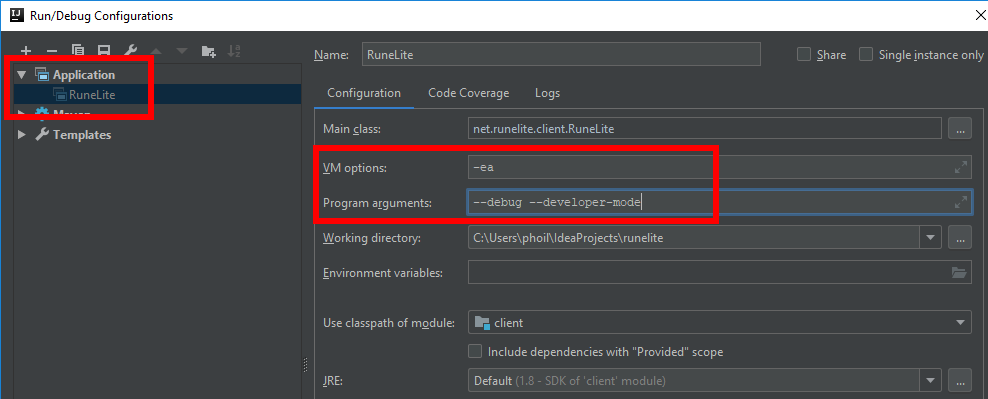
- We need to edit the VM options and Program Arguments to include additional parameters
- The VM options require the following option added:
-eaAt this stage, it is also recommended to add debugging support to your RuneLite configuration. This will allow the use of log.debug() print statements, which is really useful when developing.
- The Program Arguments require the following options added to support debugging:
--debugWe have not yet discussed the RuneLite Developer Tools (see the next section), but I highly recommend adding them to your RuneLite configuration.
- The Program Arguments require the following options added to include the RuneLite Developer Tools:
--developer-modeThe final configuration should look like the image below. Make sure you are editing the RuneLite configuration and not the Build configuration!
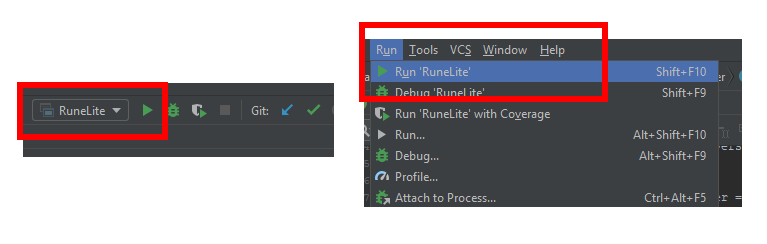
Done! We have finished configuring IntelliJ and the RuneLite project and are ready to actually run the client! Once the RuneLite project has been built, and we have set up the RuneLite configuration we can finally run RuneLite client that we have compiled by ourselves! The first step in development! The key thing here: make sure you are on the RuneLite configuration. This can be selected using the configuration drop-down menu in the IntelliJ IDE. This can be found in the top menu bar and has a cog icon next to it (check the image below for an example).
After selecting the RuneLite configuration, we need to just Run the build process specified by the Maven project. You can use a variety of methods to achieve this:
- Left-click the green arrow icon next to the configuration menu
- Navigate to Run, then select Run ‘Build’
- Or simply use the shortcut hotkeys
Shift+F10
NOTE: As documented on the RuneLite Wiki: If the client fails to boot or if the applet does not appear, try to rebuild the project by running the Maven builder again. If that also doesn’t work, feel free to ask for help in the discord server. Again, I did not experience any issue here, but this might be useful for readers of this post.
The RuneLite Client Developer Tools
We briefly mentioned the developer tools in the previous section. It is highly recommended that you enable the RuneLite Developer Tools. This part was a mystery to me, as there is limited documentation on the developer tools. Not complaining at all, the RuneLite developers do a fantastic job - and it is very hard to maintain thorough and comprehensive documentation for such a fast-moving, popular project. Their new JavaDocs documentation for the API is amazing! We will discuss this is a later post…
Anyway, the RuneLite Developer Tools are pretty much what the named would suggest. A set of tools to help developers write code for the RuneLite project, especially plugins! The image below displays the Panel menu for the developer tools to give you an idea of what is provided.

As you can see, the developer tools have a Panel menu, similar to other RuneLite plugins. From the names used on different buttons, you can probably get a good idea of the different functionality provided by these tools. After writing some plugins for RuneLite, I thoroughly recommend using these tools. They are excellent!
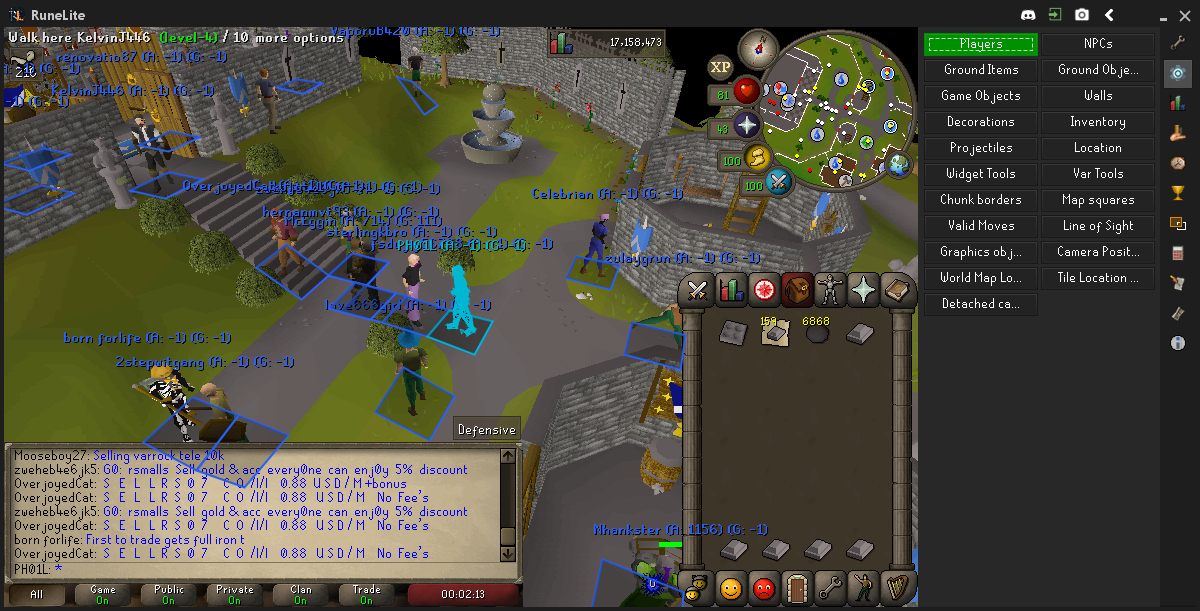
The image below shows a simple example of the developer tools in action. Notice how the Players tool has been enabled - the button in the Panel has turned green (enabled) and the tool highlights all players in your characters immediate environment. I think I was making cannonballs just before taking this screenshot!
Summary of the Run Configurations
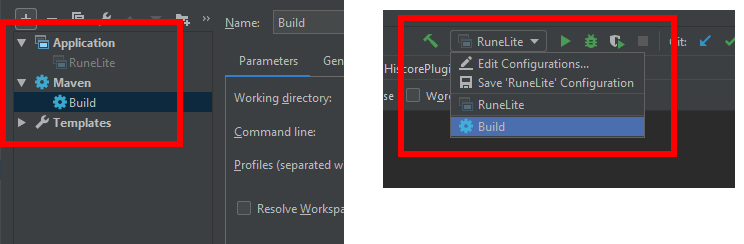
As a quick summary, so far we added two different run configurations for: 1) Building (compiling) the source code into executable code, and 2) Running the actual RuneLite client. You can see a summary of the two configurations in the image below. The image on the left is the IntelliJ project configurations dialog box, one called RuneLite and one called Build. On the right is the fast access configurations menu provided in the main IntelliJ IDE window. This allows for fast switching between configurations. Notice again we have RuneLite and Build configurations to select from.
This part of the process confused me a little the first time I was setting up the RuneLite development environment. I didn’t quite get why we were creating two configurations, and unsure of exactly what they did. However, I learned that each configuration has a different purpose:
- Build: This is the configuration we created. Like the name Build (that we gave it) suggests, it is for building or compiling, the RuneLite project. Simply, building all the source code into an executable file.
- RuneLite: This configuration is for running RuneLite. So basically, we run the built source code using this configuration.
After figuring this out, the entire process made a lot more sense! As a summary, when I am developing I use the following process:
- Edit source code, modify plugins, add debugging statements etc.
- Select Build configuration
- Run the Build configuration to compile the source code (note that you can just recompile certain blocks/folders of code instead of the entire project if you make specific changes)
- Switch to the RuneLite configuration
- Run the RuneLite configuration to actually run RuneLite (launch the RuneLite client that was just modified)
Conclusion
Success! I hope you have made it this far and got a RuneLite development environment configured and have compiled and run the client. After looking back at this post, it is quite lengthy. But I hope that the descriptive nature helped you - and if not, you can be proud that you already have a great understanding of the RuneLite project and programming in IntelliJ and Java.
I learned a lot from this process, and feel I always learn more when trying to convey useful information to others. Keep a lookout for a new post soon that covers Part 2 of this series, where we look at the fundamentals of authoring a RuneLite plugin including the basic plugin structure and useful methods in the RuneLite API.
Finally, if you have any questions, feedback or discovered any issues with this documentation please leave a comment below. I am happy to help if I can (for the love of OSRS!). Also, make sure to check out the official RuneLite discord, they are really helpful. Thanks!