This post discusses and provides code examples of how to author configuration menus for RuneLite plugins. This post is part of a series about writing RuneLite plugins. Previously, I documented how to configure the Build Environment for RuneLite, then provided a high-level overview of the General Structure of RuneLite Plugins).
This time, we delve deeper and actually start writing some code! The first step of a plugin is the creation of a RuneLite configuration menu. Although not essential for all plugins, configuration menus and providing options for a plugin is highly useful. This post is based on the Creating plugin config panels on the RuneLite wiki but goes into much more detail.
Contents
- Plugin Configuration
- Creating a New Plugin: Config Example
- Config File Structure
- Config Items Syntax
- Updating Plugin to Use Configuration
- Conclusion
Plugin Configuration
The RuneLite config system provides developers the functionality to make complex configuration menus for their plugins with very little effort. These configuration menus are viewable by left-clicking the wrench icon located in the top right corner of the RuneLite client. When you open the menu you will see the configuration options for all RuneLite plugins.
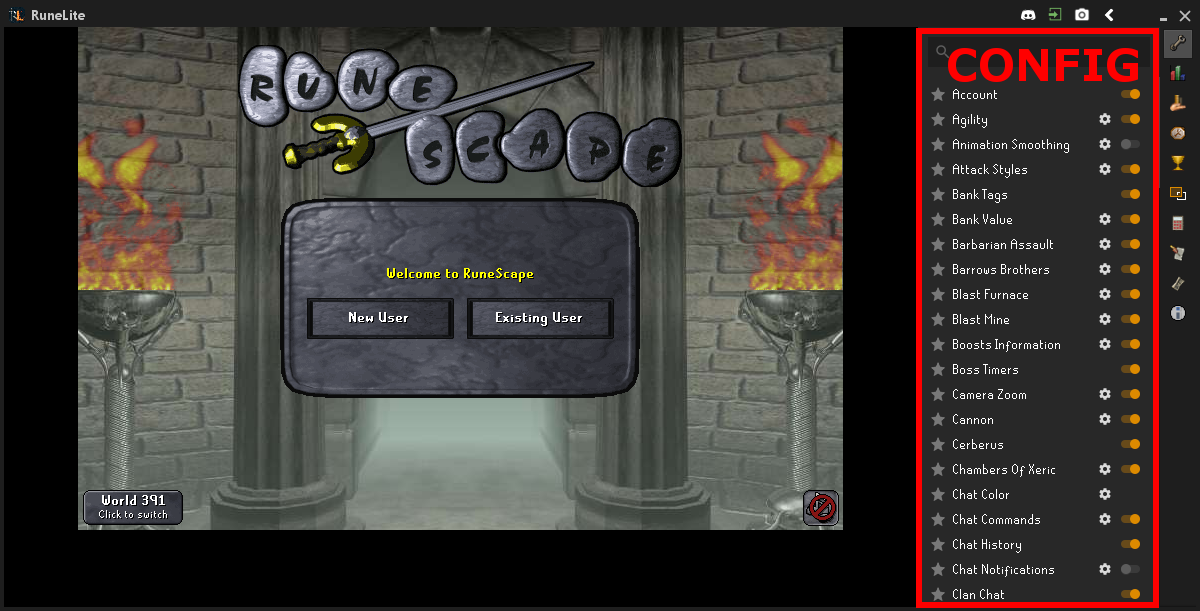
Most OSRS players have most likely already seen examples of these menus. But, just to be thorough the image below provides an example of three configuration menus for the Agility plugin, the Motherloade Mine plugin and for the actual RuneLite client itself (this is actually not a plugin, but uses the same configuration menu as plugins use). Note the different configuration menu entries that include check boxes, combo boxes and color selectors.
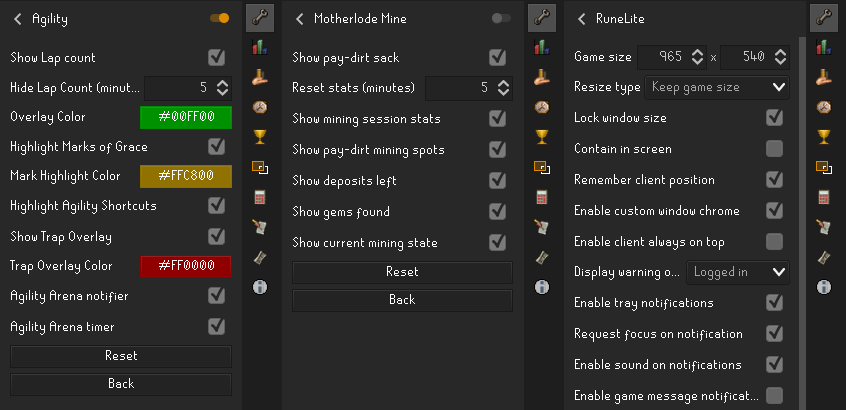
As you can see from the examples, the RuneLite configuration system allows for the inclusion of a variety of different methods to store and set configuration options. Specifically, there are six different options. I have classified these below based on the type of value they are designed to store.
- Boolean: Implemented using a simple checkbox. Check for enabled (true) or unchecked for disabled (false)
- Integer: Implemented using a simple spinner box. Can use up and down arrows to increase or decrease the integer value, or type an integer value directly in the box
- String: Implemented using a simple textbox, allowing the user to enter in a string. Commonly used to store multiple string values by using a comma-separated list of strings.
- Color: Implemented using a color selector interface available in Java
- Enumerator: Implemented using a simple combobox. A user will be presented with a drop-down box with the ability to select an option from the provided list
- Dimension: Implemented using two spinner boxes. Not widely used in plugins. However, the RuneLite configuration menu uses it to store the default RuneLite client size (width x height)
Descriptions are great and, well, descriptive… But pictures help a lot with understanding. Below is an example configuration menu I wrote for a testing plugin named Config Example which demonstrates the use of the six common configuration options. The order of the configuration menu in the image below is the same order as specified in the list above.
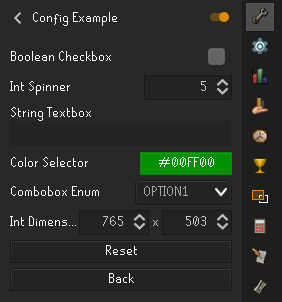
In addition to any specified menu items, each plugin menu also contains two buttons at the bottom of the configuration menu. There is a Reset button which will reset any configuration options to the default values. Furthermore, there is a Back button to navigate back to the primary configuration menu that lists all the plugins.
Creating a New Plugin: Config Example
The remainder of this post uses an example plugin named Config Example to help display how to use the RuneLite plugin configuration menu. This example plugin is available in my forked version of the RuneLite GitHub repository. The code is available in the osrsbox-plugins branch of the repository. Specifically, you can view the ConfigExampleConfig.java file for a complete example that demonstrates each of the six types of configuration menu items available.
Remember from my past post (General Structure of RuneLite Plugins), the location for all RuneLite plugins is:
runelite/runelite-client/src/main/java/net/runelite/client/plugins/Inside this folder, you can create a package (basically a folder) which contains all the source code (Java class files) for your plugin. Make sure to pick a descriptive name. In this example, my plugin is named Config Example. To start development of the plugin, I have made the following directory (the RuneLite plugin uses a lowercase naming convention for plugins):
configexample
Inside this directory I have included the following two files:
ConfigExampleConfig.javaConfigExamplePlugin.java
All configuration entries described in the following sections are to be populated into the ConfigExampleConfig.java file. This file, ending with Config.java is where all configuration source code should be placed. The basic naming convention is <PluginName>Config.java.
Config File Structure
The remainder of this post uses the Config Example plugin to help display examples of how to use the RuneLite plugin configuration. Luckily for us, the RuneLite plugin configuration system is simple yet powerful. Also, there are many existing plugins for which to base new plugin configurations - so, reading the source code available for other plugins is excellent to learn from. Below is a code snippet for the general structure of a plugin configuration file.
package net.runelite.client.plugins.package_name;

// Mandatory imports
import net.runelite.client.config.Config;
import net.runelite.client.config.ConfigGroup;
import net.runelite.client.config.ConfigItem;

@ConfigGroup("package_name")
public interface plugin_config_file_name extends Config
{
    // Configuration menu items go here
}
As with most Java classes, the first line summarizes the package. Based on the RuneLite project and naming convention, all plugin configuration files have the following first line:
package net.runelite.client.plugins.package_name;In our Config Example plugin, we would simply replace package-name with the name of the actual package. In our example, we would name it: configexample, as illustrated below.
package net.runelite.client.plugins.configexample;The config file imports should be the same for every RuneLite plugin (unless you are doing something special). They are documented below:
// Mandatory imports
import net.runelite.client.config.Config;
import net.runelite.client.config.ConfigGroup;
import net.runelite.client.config.ConfigItem;
The remainder of the configuration file is the body of the configuration file. This is where we will put the actual configuration file entries. The block starts with a @ConfigGroup followed by the package_name. Make sure to replace this package-name value with the name of the actual package. In our example, we would name it: configexample. We should also change the plugin_config_file_name placeholder name (this class name) with the actual name of the configuration file. In this example, we would change it to: ConfigExampleConfig.
@ConfigGroup("package_name")
public interface plugin_config_file_name extends Config
{
    // Configuration menu entries go here
}
Note how the Java class extends Config. This is exceptionally important and is basically saying that we want to add on to the configuration system that is provided by the RuneLite client. This is why making configuration menus in RuneLite is so simple.
Config Items Syntax
Now that we have the skeleton structure of the configuration file we can start adding actual configuration menu items. These are quite easy to add, and basically, we just need to figure out what sort of configuration menu entry to add and give it a good naming convention and description. The basic syntax of a configuration menu item is displayed in the code snippet below.
@ConfigItem
(
        position = integer_value,
        keyName = "string_variable_name",
        name = "string_configuration_display_name",
        description = "string_configuration_mouse_hover_name"
)
default data_type string_variable_name() { return default_value; }
The example above looks a little cryptic (because of all the place holders), so we will have a look at an example configuration menu entry. In the following code snippet, a menu entry has been specified that adds a checkbox that can be toggled on and off. This is a boolean data type (true, false).
@ConfigItem
(
        position = 1,
        keyName = "booleanConfig",
        name = "Boolean Checkbox",
        description = "Simple example of a checkbox to store a booleans value"
)
default boolean booleanConfig() { return false; }
It is prudent to discuss how each entry is used in the RuneLite configuration menu. The following items are all useful for configuration of menu items:
position: Where the configuration menu item will appear. This is an integer value which starts from number 1 (not 0!). You can use this value to control what order menu items appear in the RuneLite configuration menu.keyName: This value is used to refer to the configuration value when writing a plugin, so it is useful to specify a short and descriptive name. For example, the Agility plugin hasshowLapCountto toggle whether to display the number of laps done, andhighlightMarksto toggle whether to highlight Marks of grace on the client.name: A short, but descriptive, name that summarizes the configuration item purpose. The configuration menu is not very wide, so long names do not work well here. Using the same examples as above, Show Lap count and Highlight Marks of Grace are the name values for thekeyNames specified above.description: This value is displayed when hovering a mouse over the menu item. This value should be long and descriptive (but not too long!), providing additional information about a specific configuration.
The final piece of code for each config item is the setting of a default value. This line of code will also dictate what type of config item is created (boolean, int, string etc.). Take the following example:
default boolean booleanConfig() { return false; }In the above example, we are specifying that the boolean data type is used which makes a checkbox that can be toggled on and off - which, behind the scenes, is using a true/false value. You also need to return a value, in this case, we are returning false to set the default configuration to a boolean that is false or switched off.
I think each of the config items requires additional discussion, as they can vary a little in use. Below is a section for each of the six different items (data types) that we can specify in RuneLite plugin configuration.
Boolean Value (Checkbox)
We have already briefly discussed the boolean data type, which creates a checkbox. An example of the entry in the RuneLite configuration menu is displayed below, followed by an example of the code required to implement it:

@ConfigItem
(
        position = 1,
        keyName = "booleanConfig",
        name = "Boolean Checkbox",
        description = "Simple example of a checkbox to store booleans"
)

default boolean booleanConfig() { return false; }
Integer Value (Spinner)
The integer data type creates a spinner box. An example of the entry in the RuneLite configuration menu is displayed below, followed by an example of the code required to implement it:

@ConfigItem(
position = 2,
keyName = "intConfig",
name = "Int Spinner",
description = "Simple example of a spinner to store integers"
)
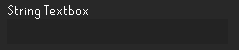
default int intConfig() { return 1; }String Value (Textbox)
The string data type creates a textbox. An example of the entry in the RuneLite configuration menu is displayed below, followed by an example of the code required to implement it:
@ConfigItem(
        position = 3,
        keyName = "stringConfig",
        name = "String Textbox",
        description = "Simple example of a textbox to store strings"
)
default String stringConfig() { return ""; }
Color Value (Color Selector)
The color data type creates a color selector interface where a user can select any type of color. An example of the entry in the RuneLite configuration menu is displayed below, followed by an example of the code required to implement it:

@ConfigItem(
        position = 4,
        keyName = "colorConfig",
        name = "Color Selector",
        description = "Simple example of a color selector"
)
default Color colorConfig() { return Color.GREEN; }
Enum Value (Combobox)
The enum data type creates a combobox menu where a user can select from a set of predefined values in a drop-down menu. An example of the entry in the RuneLite configuration menu is displayed below, followed by an example of the code required to implement it:

enum OptionEnum
{
OPTION1,
OPTION2,
OPTION3
}
@ConfigItem(
        position = 5,
        keyName = "enumConfig",
        name = "Combobox Enum",
        description = "Simple example of a combobox to select from a list"
)
default OptionEnum enumConfig() { return OptionEnum.OPTION1; }
Dimension Value (Two Spinners)
The dimension data type creates two spinners where a user can select two different integer values. An example of the entry in the RuneLite configuration menu is displayed below, followed by an example of the code required to implement it:

@ConfigItem(
        position = 6,
        keyName = "dimensionConfig",
        name = "Int Dimension",
        description = "Simple example of a dimension to select to integer values"
)
default Dimension dimensionConfig() { return new Dimension(765, 503); }
Updating Plugin to Use Configuration
In the previous section we have created a configuration menu for a plugin and we investigated the six different types of menu items that can be used. However, these are completely useless unless we can grab the configuration values and use them in a meaningful way in our plugin. Luckily, it is easy to inject our plugin configuration class and fetch the configuration values.
Before we start with how to fetch the configuration values, we should first discuss an additional item that is usually situated in the plugin file. Each plugin file should have a Plugin Descriptor which also provides functionality to the configuration menu. The following code snippet is an example of the Plugin Descriptor I have used for the Config Example plugin.
@PluginDescriptor(
        name = "Config Example",
        description = "A simple example plugin to illustrate how to write plugin config menus",
        tags = {"config", "menu"},
        loadWhenOutdated = true,
        enabledByDefault = false
)
As you can see, the Plugin Descriptor entry documents basic information about a plugin. The important properties for configuration menus in the name, description and tags values. The following list documents the important property values for configuration menus:
name: The name of the plugin, as displayed in the primary RuneLite configuration menu list.description: The value displayed when hovering over a plugin name, as displayed in the primary RuneLite configuration menu list.tags: Used to assist the primary RuneLite configuration menu search. Any keyword listed here will be parsed when searching for plugins.
Other properties in the Plugin Descriptor entry are related to actual plugin operation. Therefore, we will discuss further information about this configuration in a future post.
To actually use the configuration items that you have authored you must inject the config class into the plugin file. This will make the configuration options accessible and usable during plugin development. To achieve this, you need to add the following line
@Inject
private ConfigExampleConfig config;
The code snippet above injects the ConfigExampleConfig class. This class can now be accessed using the config keyword. You will need to change your class to your own plugin configuration class, which will vary depending on the naming convention you used for your configuration file.
From here, you can simply call the config class, followed by the configuration menu item keyName. As an example, I created a menu entry with the keyName value of booleanConfig. I can call the config class with this key name to get the actual value of the configuration file entry.
config.booleanConfig()That previous example was a little cryptic - because there is no context of how it is actually used. The code snippet below uses the same code in a conditional (if) statement.
if (config.booleanConfig())
{
        // Do something here when enabled/true
}
else
{
        // Do something else when disabled/false
}
Another example… I could fetch the colorConfig key using the following code.
config.colorConfig()Conclusion
As I mentioned previously, I would recommend reading the code from other plugins to see how other developers utilize the menu configuration in their plugins.
I hope this post helped you understand the RuneLite plugin configuration system and helped you start developing RuneLite plugins. As always, please leave a comment below if you notice any errors, or have any feedback. I really enjoy writing these posts and really hope that you have found it useful and informative! Thanks!